
Having a good element selection policy is key to good test automation. Why is this so hard? We believe it doesn’t have to be.
There are many discussions online around element selectors, and poorly designed selectors lead to flaky tests.
One of the better summaries we found can be found here:
https://www.martinmcgee.dev/choosing-resiliant-element-selectors-modern-web/
To quote the article:
Brittle element selectors are the number one cause of flaky automation tests – if a developer adds a div to the page, your test is broken.
The article outlines the problems of relying on the element id or introducing a custom attribute, such as Cypress “data-cy”, to identify your elements.
Let’s say that we are trying to target a password input box. The following element selector is clearly a bad idea, that any change in the page structure will break the test
/html/body/div[1]/div/div/div[2]/main/div/div/form/div/div[1]/label/div/div[2]/div/inputFrom the article, we find ourselves with a fairly straightforward element selector.
//input[type="password"]In the end, the best possible element selector needs to be
We keep this in mind as we design a new type of selector.
In Boozang we take a similar approach by relying on what’s visible on the page. This “natural-language selectors” will be easy to understand, and resilient to changes as long as the actual labels aren’t changed.
We have now introduced a dependency on UI labels. This might seem undesirable at first, but it actually provides a huge benefit. Imagine the following CRUD scenario
If we would base these selectors on hidden attributes, class, or id, I wouldn’t be able to perform this test.
By letting the computer use the same way to identify page elements as a manual tester would, we allow for a more natural way of writing a test.
We will use the below form example from The Lab (http://thelab.boozang.com/formFill) to illustrate this.

If this form fill is recorded in Boozang it will look the following way
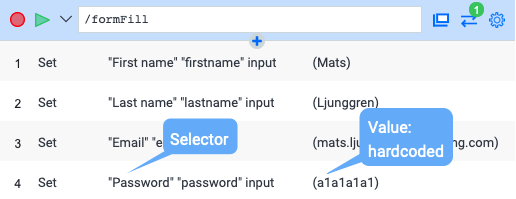
As you can see, there are no dependency on hidden elements such as “id” or “class” that wouldn’t be visible to a manual tester. By using the record function we have managed to create a stable selectors that are easy to read and understand.
In order to create re-usable tests, it’s often desirable to parameterize the data. This is easily done in Boozang using automated data-bind
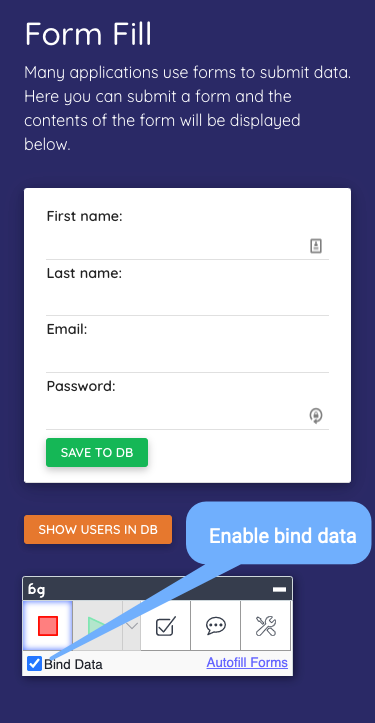
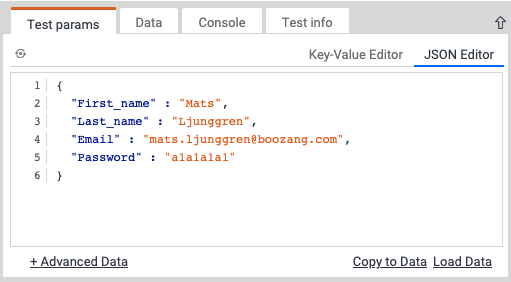
When checked, all the form data will automatically be captured as $parameter data in JSON format.
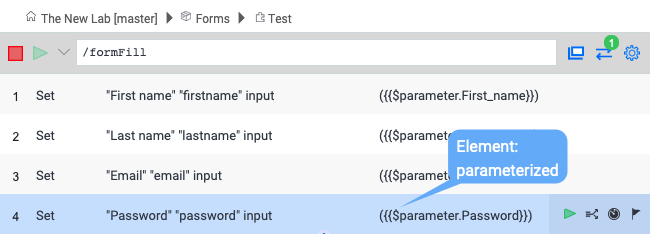
As you can see in the parameter window, we now have a data-driven test where the variable names directly correspond to the form labels.
Often the automatically generated selectors in Boozang works fine. There will still be cases when you’ll need to edit them.
The generated selector can be found in the “Action Config” tab.
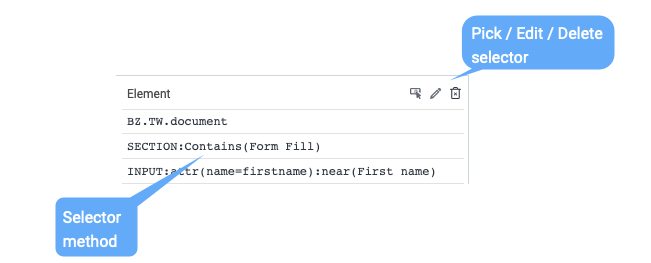
As you can see, this is a powerful selector, as it relies on both the attribute value and label name. By default, there is nothing that binds this selector to either class or id:s.
As you can see there are three actions available to us
It is also possible to edit the selector in the multi-line select box directly.
Instead of editing the selector directly in the input box, you can access the DOM picker by hitting the edit button (as shown in the image above).
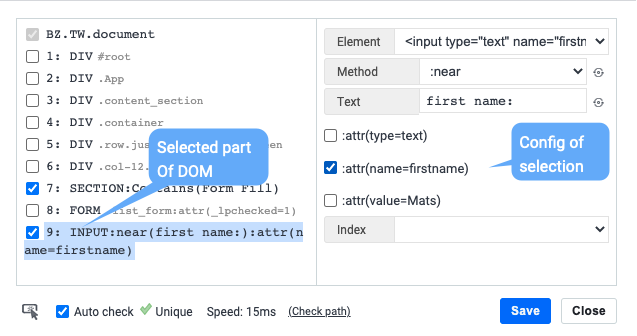
In the left view, we can see the selected element, along with all the element parents. Boozang follows jQuery conventions for element selectors: https://api.jquery.com/category/selectors
Using that convention
we can conclude that the page structure relative to the element is
<html>
<head></head>
<body>
 <div id="#root">
   <div class="app">
    <div class="content_section">
     <div class="container">
      <div class="row justify-content-between">
       <div class="col-12 col-md-6 col-xl-5">
        <section class="form_section">
         <form class="list_form">
          <input type="text" name="firstname"/>
         </form>
        </section>
       </div>
      </div>
     </div>
    </div>
   </div>
  </div>
</body>
</html>
As you can see, this is not the full DOM tree of the page, but a cascade of elements based on the selected element. By clicking on any elements, you can inspect further any attributes. You can then use the checkboxes to activate that selector.

In the example above, we have changed the selector to be based on the form with class “list_form” instead of the section.
A note on the root node: BZ.TW.document refers to to the application page content, and cannot be changed. The reason why this is displayed, is that it will look different when working with iframes, where it might look something like $(BZ.TW.document).findIframe(0).
In the right view, you can see three fields
Using the element dropdown is useful when trying to update the selector without having to re-pick the element from the page, which can be quite tricky.
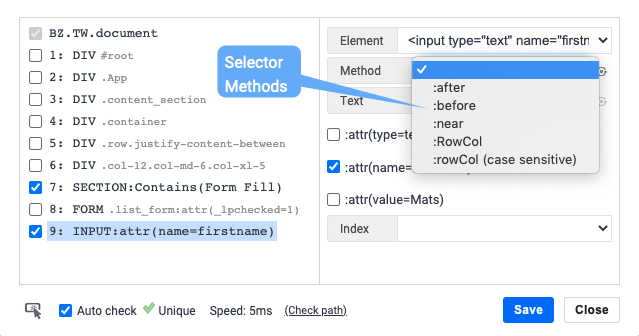
Boozang supports the following natural-language based selector methods that are automatically generated by Boozang recording
These are by far the most important selectors, and almost in all cases these are sufficient to build selectors that are incredibly stable and easy to understand.
We also support additional selectors that can be inserted manually
Boozang also supports the following case-insensitive selectors that can be manually inserted
We have also introduced two very fast selectors that can be surprisingly useful dealing with tricky selection challenges
The “after”-selector is very useful when replacing the “near”-selector in a form fill, and the “before” selector when checking a “checkbox” based on label.
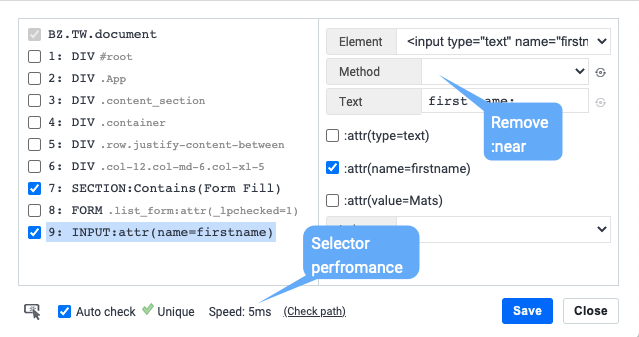
To make this selector a little less strict we can remove some selector conditions. In below image, we have removed the “near” selector using the method dropdown. This way we get a simplified selector, and as you can see it’s even faster.
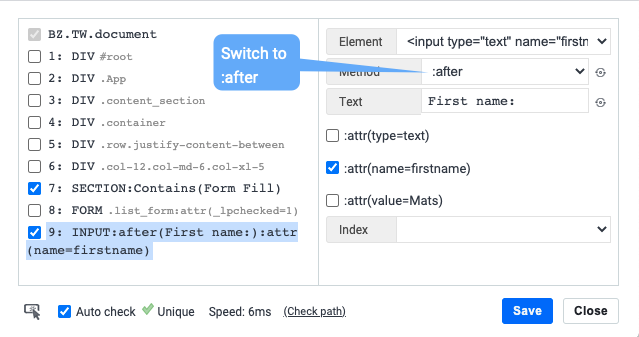
We will now try out using the smart selector tool to change the element selection methods.
We can try out the “:after” and “:before” selectors for this example.
If we select after in the method dropdown, we can re-calculate the “text” by using the refresh button on the “Text” input. We can see that the result is very much the same as with the “near”-selector. We can also see that it is a faster selector (only 6 ms).
If we now to the same exercise with the “before”-selector, we can see that we get a similar result, but with “Last name:” instead of “First name:”

In the same way, we can also automatically find a selection method based on a particular “Text”. Type in “Last name” in the text box, and click the refresh on the Method box, and it will find the best method of finding that element based on the entered string.
Having a good element selection policy is central to your test automation effort. Using a natural-language element selector that follows as close as possible to how a human should test is the best approach that leads to low test maintenance and best re-usability in the long run.
An exhaustive list of element selectors can be found in the official documentation: http://docs.boozang.com/#elements
Codeless testing that works. No credit card or commitment required.